Your Trusted Source for Quality Products
How to Install and Operate Japanese Gas Blow Heaters (Gas/LPG) in Pakistan
Now that you have purchased Safe Gas heater, it is time to install it properly to ensure it operates problem free for years to come.
Step By Step Guid
Step 1: Connecting Your Hybrid Electric Gas Heaters to a Gas Outlet
This procedure is not different from the process required for operating a normal gas heater. Find the gas outlet and connect with your gas heater. We recommend using 8.5mm connector pipe because it is strudy and thick enough to withstand any bends or damage.
Make sure to secure the pipe with a clip ring at gas connection point and both heater and the wall.


Connecting Your Electric Gas Heater to a Gas Cylinder
Due to Sui Gas shortage people have started using refillable LPG gas cylinders. When connecting your heater with LPG cylinder make sure to put the cylinder outside of room at safe distance. Also, ensure to use a high quality regulator to protect heater from damage. Normally, a 4-KG gas cylinder can run a Comfort Solutions small/medium hybrid heater for around 30 hours.
Step 2: Placement of Heater
Best thing about Safe Heater is that it heats the room uniformly and quickly. It is important to place the heater at length of room so that blower could circulate hot air to maximum coverage area.
Do not obstruct/block the heater vents as it will not only reduce efficiency but would also damage blower motor inside.
Step 3: Plugging Your Hybrid Heater into an Electrical Socket
Now it is time to plug your heater into electrical socket. Please conform that your Heater is installed with Comfort Solutions 220v converter before CONNECTING YOUR HYBRID HEATER DIRECTLY TO AN ELECTRICAL SOCKET. It can cause permanent damage to your heater as Japanese heaters run on 110v AC power and are required to be installed or connected to 220v to 110v transformer.
IMPORTANT NOTE: DO NOT USE HEATERS WITH ELECTRIC GENERATORS. 220v to 110v converter/transformer often get blowed while running it on Generator power during load shedding. Thus, we do not recommend running it on Generator due to voltage fluctuation. Although, these heaters are perfectly safe to use with a UPS.
Step 4: Using Operation Panel - Turning Your Hybrid Heater On
A downside of Rinnai Japanese Gas Heaters is that the operation panel is Japanese labeled. It’s a minor issue since important buttons and controls are easy to spot and self-explaining.
Power Button It is usually the rightmost button on the top control panel of your heater. On Japanese heaters the power button is labeled as ‘Operation’.
Turn on heater by pressing 操作 Operation (On) button. Please see image below so locate the operation button. Under normal circumstance, when you press the Operation button, a red LED light, a blinking green LED light and a regular LED light will illuminate. The red LED light stands for Combustion (燃焼) indicating that hybrid heater is operational. The blinking green LED light indicates the current room temperature of your room, and finally the static green LED light denotes the desired room temperature.

Note that when you turn your hybrid heater on, you will hear a continuous crackling sound for about 4 to 6 seconds, which is essentially the ignition mechanism of the unit. If the gas pressure is low, this sound may continue longer than usual. Please note that in the absence of gas, the heater will not switch on at all.
Step 5: Using Operation Panel - Adjusting the Room Temperature
Japanese Safe Heater comes with climate control feature which allows you to regulate the room temperature as desired. Usually the heater allows you to adjust the temperature of the room anywhere between 16C to 26C (degree Celsius). Locating the temperature controls is fairly easy as shown in the image below. Usually these controls are labeled as 環境制御 (Climate Control) or 室温 (Room Temperature) with two buttons (LOW usually denoted by a left arrow and HIGH usually denoted by a right arrow). Pressing the right button when you want to increase the desired room temperature (more warm) and left button when you want to reduce the desired temperature (less warm).

Step 6: Maintenance (Dust Filter)
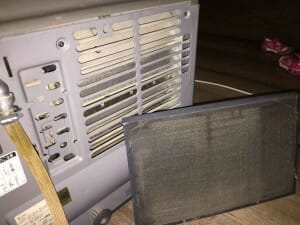
There is a removable metallic filter on the rear of all gas blower heaters. With continuous usage, this filter accumulates dust and becomes clogged if it is not cleaned. This filters needs to be kept clean to ensure uninterrupted airflow and ventilation. The heaters are smart enough to detect a dusty or clogged filter and will turn off automatically after few minutes of operation.
A dusty filter is also indicated by red LED labeled filter, which turns on when the heater requires

Step 7: Safety Child Lock
Some of the more recent hybrid heaters also come with a child lock feature which prevents children to inadvertently press random buttons on the control panel of the unit. Usually this involves pressing and holding the ‘Save’ and ‘Sleep’ buttons simultaneously together for activation. This will disable all buttons on the unit thus preventing children or accidental button presses to alter settings. The Child Lock can be deactivated by pressing the same buttons simultaneously again.